
Engineering Design & Sourcing Guide - Large Mould
Most molding advice you read assumes a part you can hold in one hand. Wall thickness, gate location, ejection — the rules of thumb are all built around something the size of a phone case. Then a fascia panel lands on your desk. Or a 30-liter tote, or a snowmobile hood. And the numbers you trusted start to drift.
The physics doesn't change when the part gets big. What changes is that every shortcut you got away with on small parts comes back to find you. Flow length used to be a footnote. Now it's the whole problem. Clamp tonnage was a line on a spec sheet. Now it's the reason only two presses in the country can run your tool. Cooling was the mold shop's headache. Now it's your warpage number.
So this is about big plastic parts — how to design them so they actually mold, and how to source them without the quote eating your whole timeline.
The Problem: Scale Doesn't Behave the Way You'd Expect
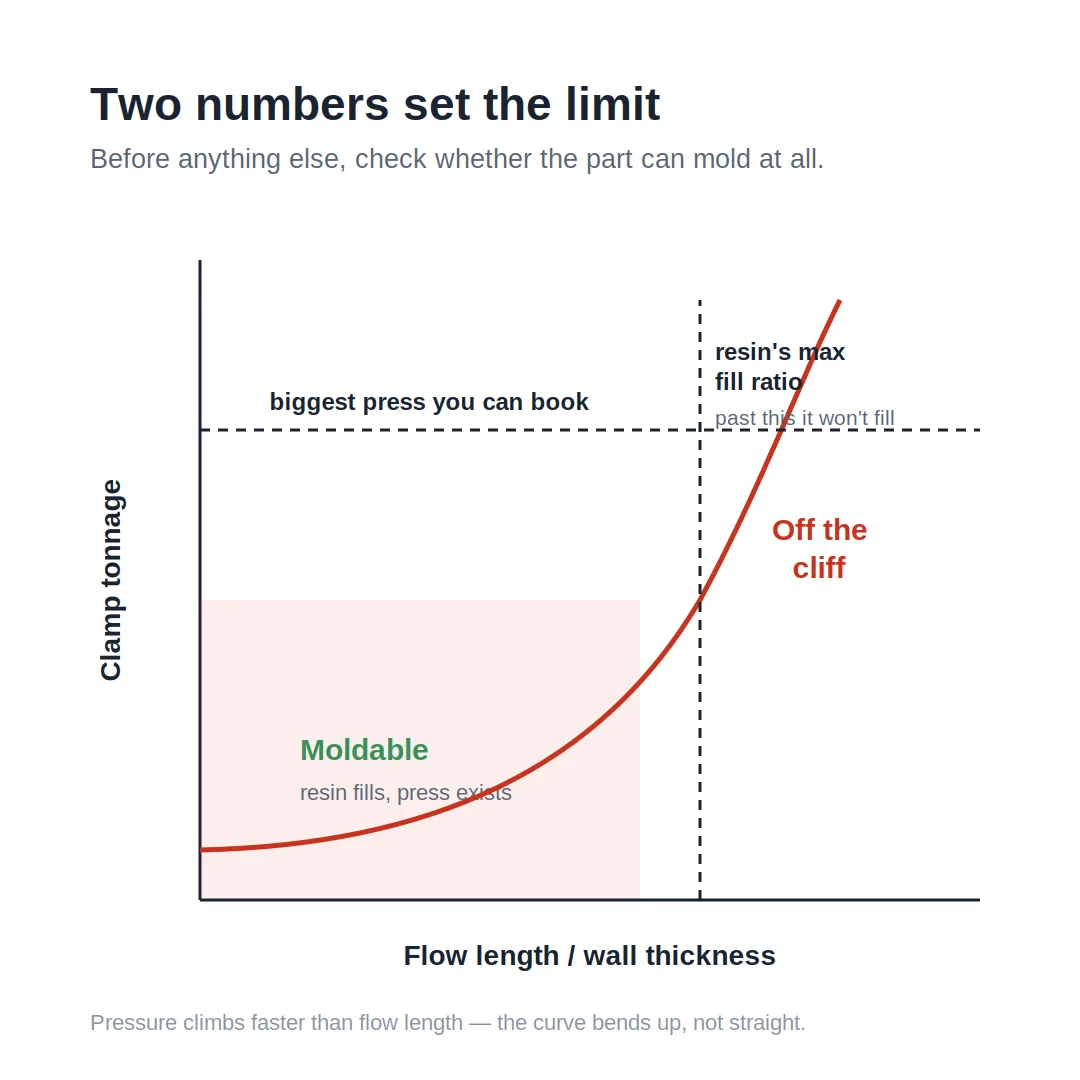
Make a part twice as long and it doesn't get twice as hard. It gets worse than that. Clamp tonnage rides on projected area, and area grows with the square. Fill pressure climbs faster than flow length does, because the plastic is cooling against the wall the entire way down the part. Cooling time goes with the square of wall thickness. Almost nothing here moves in a straight line.
That's why a part that looks like "the same thing, just bigger" often needs a different press, a different way of gating, sometimes a different grade of resin than your gut tells you. And the cost curve isn't smooth — it has steps, and the steps are press sizes. A part that needs 1,100 tons of clamp and one that needs 950 might be three millimeters of wall apart. But they're a different shop, a different lead time, a different price.
The people who are good at this aren't smarter about plastic than you. They just know where the cliffs are because they've walked off a few.
The Core Idea: Two Numbers Set Your Limits
Before you argue about anything else, two numbers tell you whether the part is even moldable as drawn.
Flow length to wall thickness. Hot plastic only travels so far before it freezes off. Write that distance as a ratio against your wall thickness and you've got the most useful screening number there is for a big part. Easy-flowing stuff like polypropylene might give you 250:1 or better. A stiff, glass-filled engineering resin might stop you at 100:1 or less. Take the longest path the melt has to travel from the gate, divide by your nominal wall, and check it against the resin. Go over that number and the part won't fill. Not "fills poorly" — doesn't fill, until you add gates, thicken the wall, or push the process harder, and that last one drags its own problems in behind it.
Clamp tonnage. The melt shoves back on the mold, hard. Roughly the projected area of the part — the shadow it throws looking straight down the press — times the cavity pressure. For a big part that pressure usually sits somewhere around 2 to 5 tons per square inch depending on the resin and the wall. Run the math and you're into the hundreds or thousands of tons quickly. That number decides which presses on the planet can run your tool, and the list is shorter than you'd like.
Everything after this — gating, cooling, packing — is just work to keep you inside the box these two numbers draw.
The Mechanics: Where Big Parts Bite You
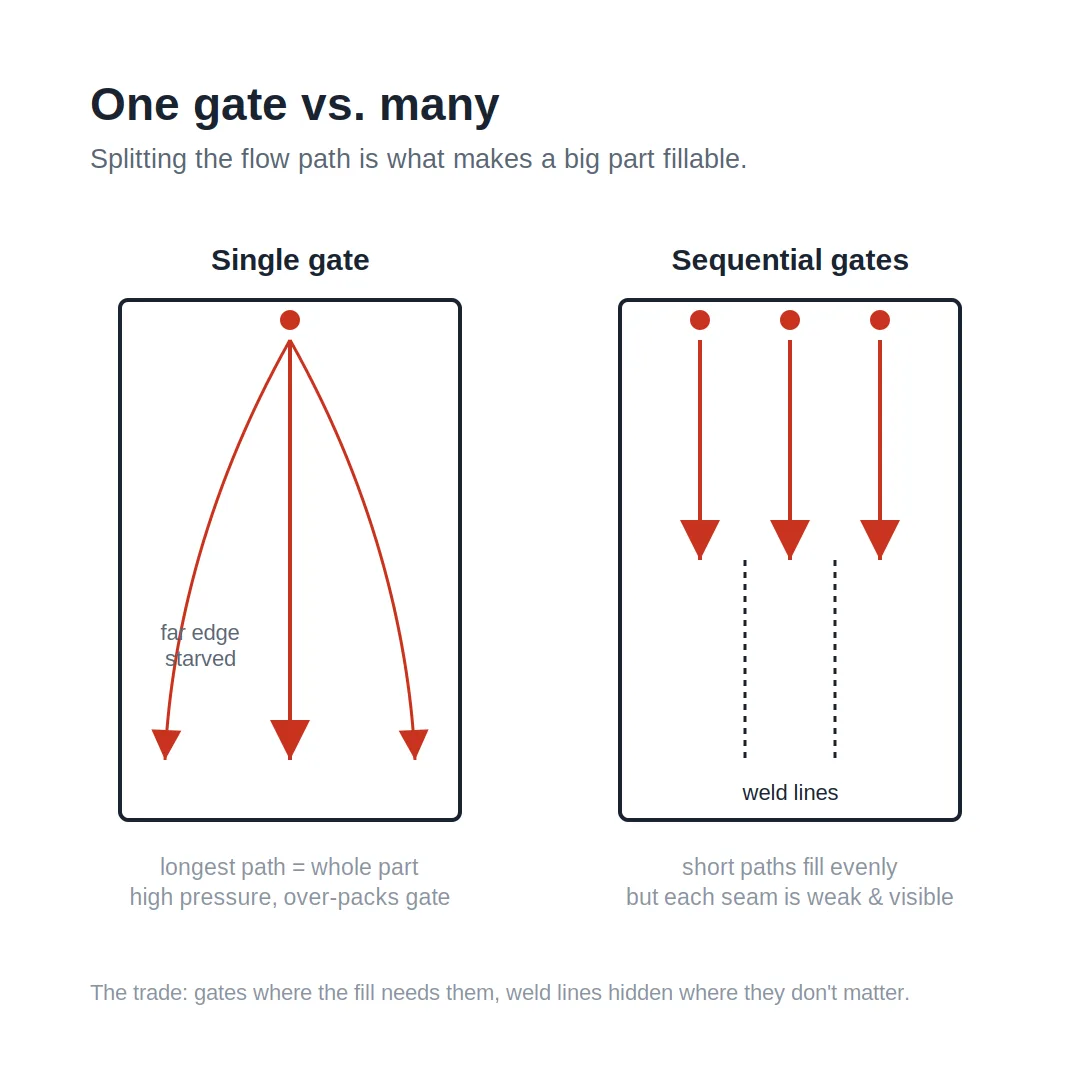
Gating, and why one gate rarely cuts it. Put a single gate on a large part and the longest flow path becomes the entire part. The pressure it takes to fill that distance bends the tool, over-packs the plastic near the gate, and leaves the far edge crawling in starved. So big parts run multiple gates, usually sequential valve gates on a hot runner, which chops that long flow path into pieces you can actually fill. The catch: every place two flow fronts meet, you get a weld line, and weld lines are both weaker and easy to see. Now the design job is a juggling act — gates where the fill needs them, weld lines tucked where they won't matter for strength or looks. On a Class-A surface that's not a small detail. That's the whole fight.
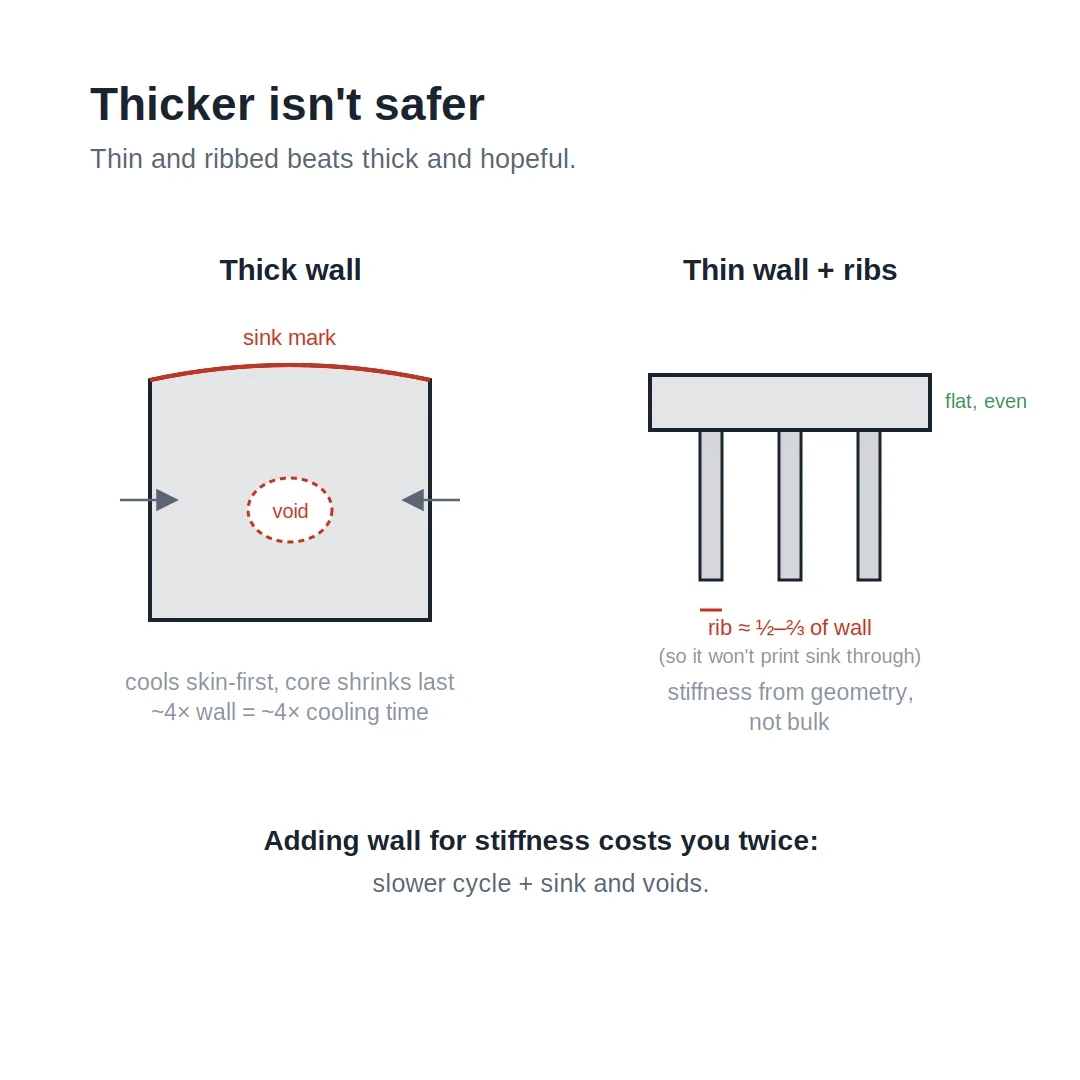
Wall thickness, and why thicker backfires. The reflex on a big part is to add wall for stiffness. It costs you twice. Cooling time goes with the square of the wall, so 4 mm cools something like four times slower than 2 mm — straight onto your cycle time, on a part that's already tying up an expensive press. And thick sections cool from the skin inward, so the middle shrinks last and drags the surface in behind it. That's your sink marks and your hidden voids. The better answer is a thin, even wall with ribs and geometry doing the stiffening. Keep ribs around half to two-thirds of the wall they join so they don't print sink straight through to the show face.
Warpage — the thing large parts are really about. Small parts warp too. But on a wide flat panel, a tiny bit of uneven shrinkage turns into millimeters of bow you can spot from across the room. It comes from cooling that isn't even, and from fiber lining up with the flow in filled resins — the part shrinks less along the fibers than across them, and it curls. There's no single fix. You balance the cooling so it actually reaches the middle of the tool, which is genuinely hard on a big mold. You place gates to point the fiber where you want it. You keep the wall even. And sometimes you just accept the part has to cool clamped in a fixture after it comes off. This is where mold-flow simulation pays for itself many times over. Run the sim before you cut steel. Skip it on a part this size and the alternative is a six-figure tool that warps, which you then get to re-cut.
Getting it out, and catching it. A big part grips a lot of core surface as it shrinks onto the steel. You want more draft than the textbook 1°, especially on anything textured. You want enough ejector pins, placed well, to push it free without bending it. And you need a plan for a hot, floppy part the size of a coffee table leaving the press — which means a robot and a cooling fixture, not someone standing there to catch it.
The Tradeoffs: What You're Actually Picking Between
Tool cost against part cost. A big mold is a big block of hardened steel, and six- or seven-figure tools are normal for large automotive or appliance work. You earn that back over volume. Below some break-even the tooling cost per part is rough, and that's the point to be looking hard at thermoforming, structural foam, even large-format printing for early runs. Above it, nothing beats injection molding on price per part. The real question was never "can we mold this." It's "how many do we make before the tool pays for itself," and for big parts that number runs high.
Resin: flow against properties. The grades that flow far and fill easily — unfilled, lower viscosity — usually aren't the ones with the stiffness and heat resistance you were after. Add glass and you buy the properties, but you give back flow and you invite warpage. Pretty much every large-part resin call is a trade between "will it fill" and "will it hold up," and you're usually giving a little on both. Or you split the difference: a multi-gate layout that lets you run a tougher resin you'd never fill on one gate.
Cycle time against capital. Faster cycles want better cooling, and better cooling means a more involved, pricier tool — conformal lines, tighter cooling layouts. On a part running millions of shots, that tool cost vanishes into the time you save. On a part running tens of thousands, it doesn't. Build the tool to the volume, not to whatever's the most impressive engineering.
Structural foam, the side door. Worth saying out loud: for big, thick, structural parts — equipment housings, pallets — structural foam molds at much lower pressure. Lower pressure means lower clamp tonnage and a cheaper tool. You pay for it with a foamed core and a swirly surface. When a part is fighting you on tonnage, ask this question before you go hunting for a 3,000-ton press.
The Practical Takeaway: Sourcing It Without Getting Burned
Design and sourcing are the same conversation here, because the things that make a big part hard to mold are exactly the things a vague RFQ quietly hides.
Run the two numbers yourself first. Before drawings go anywhere, get your own rough flow-length ratio and your own rough tonnage from projected area times cavity pressure. Even a back-of-envelope figure tells you which press class you're in, and that tells you which shops can even bid. Send a 1,500-ton part to a shop that tops out at 1,000 and you've burned a week learning nothing.
Give suppliers enough to quote honestly. A big-part quote that comes back fast and cheap is usually one that skipped the hard parts. Hand over the 3D model, the resin family and grade, the annual volume and how long the program runs, the critical dimensions, which faces are cosmetic, and your tolerance on flatness and warp. That warp number is the one that separates the serious quotes from the hopeful ones.
Ask for the mold-flow study inside the quote, not after the fact. Any shop quoting a large tool without simulating fill, pack, cooling, and warp is guessing, and you'll cover that guess later in tool rework. A supplier who runs it up front and shows you where the warp and weld lines land is telling you they've been here before. That's what you're actually buying.
Push on cooling and on the steel. On a big tool, the cooling layout and the steel choice drive both your cycle time and how long the tool lasts. A shop that talks specifically about how it'll cool the center of the cavity, and why it picked a particular steel, has thought about your part. One that hands you a flat per-pound number and moves on hasn't.
And check that molding is even the right call. If your yearly volume can't earn back a six-figure tool, the best thing a supplier can do is tell you so and point you at thermoforming or structural foam instead. The sourcing partner who'd rather right-size the process than sell you the biggest tool in the building is the one to keep.
Big-part molding rewards the engineer who respects where the curves bend. Get the flow length and the tonnage honest early. Design the part thin and ribbed, not thick and hopeful. Simulate before you cut steel. Quote it with enough on the table that the hard parts can't hide. Do that and the size stops being the problem. Skip it, and you find out which assumption was lying to you — usually right after the tool's been cut.