
How to Pick a Pairing That Actually Bonds
Pick up almost any tool, controller, or power connector and you're holding an overmold. The hard plastic shell that gives it shape, wrapped in a softer grip where your hand goes—that soft-touch layer molded straight onto the rigid one. No glue, no second part to assemble, no clip. Two materials fused into one piece in the press.
When it works, it's one of the cleanest tricks in plastics. When it doesn't, you get a grip that peels off in your hand on week three, and you find out the two materials you picked were never going to stick in the first place.
That's the whole game with overmolding, and it's the thing most guides bury under process diagrams. The geometry, the gates, the press—all of that matters, but it's downstream. The decision that makes or breaks an overmold job happens before any of it: which two materials are you putting together, and will they actually bond? Get that pairing right and the rest is solvable. Get it wrong and no amount of clever tooling saves you.
So this is a materials-first guide. What overmolding is, why the pairing is everything, how to read a bonding chart, and what to do when the two materials you want don't get along.
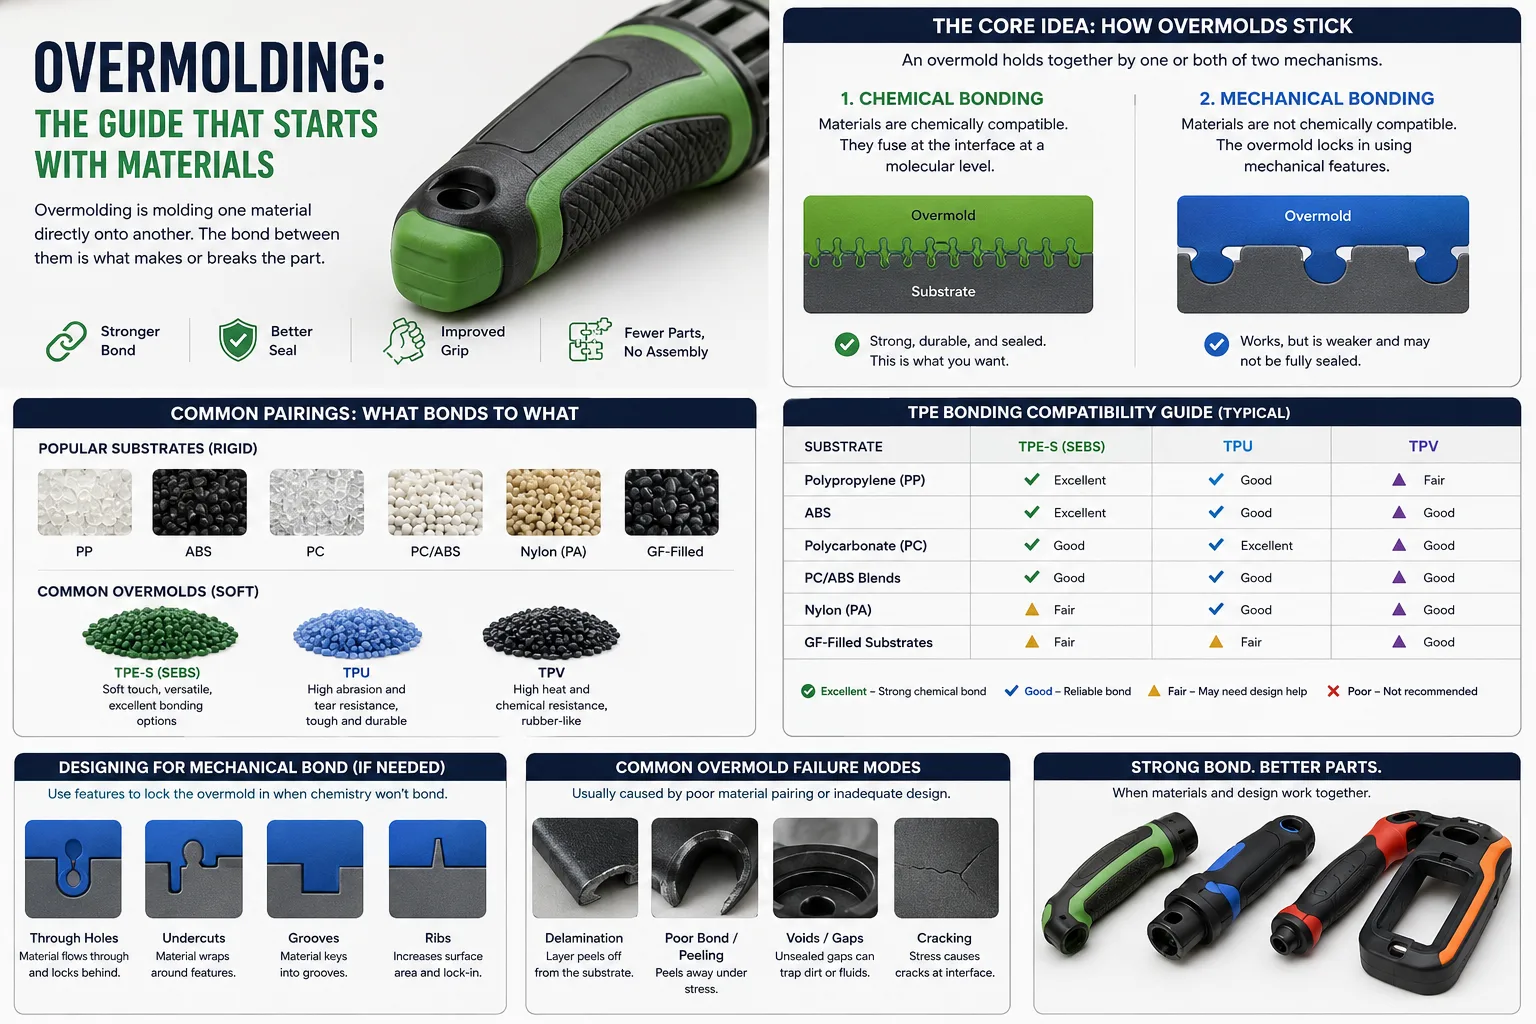
The Problem: Two Materials, One Part, and They Have to Stick
Overmolding means molding one material directly onto another. Usually a rigid substrate first—the structural shell—then a softer second material shot over it, most often a thermoplastic elastomer for grip, sealing, or feel. The appeal is obvious: you get a part that's hard where it needs strength and soft where it meets a hand or seals a joint, in one component, with the bond formed in the mold instead of in an assembly step later.
The catch is that "molded onto" is doing a lot of work in that sentence. The soft layer doesn't just need to sit on the substrate—it needs to stay there, through flexing, heat, pulling, and time. And whether it does comes down to chemistry between the two polymers that most people never check until the part fails.
Here's the trap. The substrate cools and hardens before the second shot arrives. So the elastomer is being injected hot onto an already-solid surface, and it has to grab on. There are two ways that grip happens: the materials are chemically compatible and actually fuse at the interface, or they're not, and you're relying on the soft material physically hooking around mechanical features. One of those is strong and durable. The other is a backup plan. People reach for the backup plan all the time without realizing they've done it, because they picked two materials that look fine on paper and never asked whether they bond.
The Core Idea: Chemical Bond First, Mechanical Bond as Backup
Every overmold holds together by one or both of two mechanisms, and knowing which one you're relying on is the single most important thing to understand about the whole process.
Chemical bonding. When the substrate and the overmold are chemically compatible, the hot second shot partially melts into the substrate surface and the two polymers entangle at the interface—a real molecular bond, not just contact. This is what you want. A chemical bond is strong, sealed, and doesn't need the part geometry to do anything special. The classic example is a TPE grade formulated to bond to polypropylene, shot over a PP substrate: they're chemically friendly, and the result holds. Most TPE suppliers sell grades specifically tuned to bond to a named family of rigid plastics—that tuning is the product.
Mechanical bonding. When the two materials won't chemically bond, you fall back on physics. You design features into the substrate—holes the elastomer flows through and balls up behind, undercuts it wraps around, grooves it keys into—so the soft material is locked on mechanically even though it isn't chemically stuck. Think of it as the overmold gripping the substrate the way a rubber band grips a rolled-up newspaper. It can work, and sometimes it's the only option, but it's weaker, it can leave gaps that aren't sealed, and it makes the substrate design more complicated. It's the answer when chemistry says no and you still need those two specific materials together.
The whole materials-selection question reduces to this: can I get a chemical bond? If yes, life is easy. If no, am I willing to design in mechanical retention, or should I change one of the materials? Almost every overmolding decision is some version of that fork.
The Mechanics: The Common Pairings and What Bonds to What
In practice, overmolding is mostly a small cast of rigid substrates paired with a softer overmold, and the bonding behavior is reasonably well-mapped. Here's the working knowledge.
The substrates. The rigid base is usually a common engineering thermoplastic: polypropylene (PP), ABS, polycarbonate (PC), PC/ABS blends, nylon (PA), or sometimes a glass-filled version of one of these for stiffness. The substrate choice is driven by the part's structural job—strength, heat, chemical resistance—the same as any rigid molded part. What's different is that now you also have to ask what the substrate will bond to.
The overmolds. The soft second shot is most often a thermoplastic elastomer. The big families:
- TPE-S (styrenic block copolymers, like SEBS)—the workhorse soft-touch material. Comfortable grip feel, wide hardness range, and crucially, available in grades formulated to bond to specific substrates. Great for grips, handles, soft-touch housings. The SEBS-based grades are common exactly because they're versatile and come bond-tuned.
- TPU (thermoplastic polyurethane)—tougher, more abrasion- and tear-resistant than TPE-S, better for parts that take real mechanical abuse. Bonds well to some substrates, less to others.
- TPV (thermoplastic vulcanizate)—more heat- and chemical-resistant, more like a true rubber. Common in automotive seals and under-hood parts.
- Liquid silicone rubber (LSR)—a different animal: thermoset, not thermoplastic, needs a different process (and usually treats the substrate as a true insert). Goes where you need high heat resistance, biocompatibility, or the specific feel and durability of silicone—medical, kitchen, sealing against heat.
The pairing logic. The reliable bonds are the ones the elastomer was formulated for. A PP-bonding TPE on a PP substrate. A TPU grade chosen to bond to PC or ABS. Where it gets risky is the "obvious" pairings that aren't actually compatible—a generic TPE that grips beautifully in your hand but was never tuned for the polycarbonate you shot it onto. It'll feel bonded on day one and delaminate later. This is why "what's the durometer and the feel" is the wrong first question. The first question is "what substrate is this grade formulated to bond to," and the answer should be a specific named plastic, not a shrug.
When you can't get a chemical bond. Two moves. First, design mechanical interlocks into the substrate—through-holes, undercuts, dovetail grooves—and let the overmold lock on physically. Second, if the geometry won't allow that or the seal matters, change a material: switch the substrate to something the elastomer bonds to, or switch the elastomer grade to one tuned for your substrate. Changing the grade is usually cheaper than redesigning the part, which is why talking to the TPE supplier early beats discovering the incompatibility on a failed part.
The Tradeoffs: What You're Actually Weighing
Chemical bond vs. design freedom. Lean on a chemical bond and your substrate can be simple—you don't need to litter it with mechanical-retention features. But you've constrained your material choices to compatible pairs. Lean on mechanical bonding and you can pair almost anything, but now the substrate carries undercuts and holes that complicate the tool and can show on the part. You're trading material freedom against design simplicity, and the right call depends on which constraint is tighter for your part.
Hardness vs. durability. Softer overmolds (low durometer) feel better in the hand and seal more forgivingly, but they tear and abrade more easily. Harder grades last longer under abuse but feel less premium and seal less well. A grip on a hand tool and a grip on a surgical instrument have different right answers, and the durometer you pick is a feel-versus-life trade every time.
TPE vs. LSR. Thermoplastic elastomers are easier—same general process as the rigid shot, faster cycles, recyclable scrap. LSR buys you heat resistance, biocompatibility, and a durability TPEs can't match, but it's a thermoset (so no remelting scrap), a different and often slower process, and a more expensive tool. Reach for LSR when the application genuinely demands it—heat, medical, certain seals—not by default.
One-shot complexity vs. two-part assembly. Overmolding's whole promise is eliminating an assembly step. But a two-shot or insert-molding tool is more complex and more expensive than two simple single-material tools, and the process has more ways to go wrong. At low volumes, molding two parts and assembling them (or bonding a separate grip on) can be cheaper and lower-risk than committing to overmold tooling. The overmold pays off at volume, where the saved assembly labor and the better part justify the tool. Below that, do the math before you commit.
Two-shot vs. insert molding—the process fork. Two related routes. Two-shot (multi-shot) molding runs both shots in one specialized machine with a rotating tool—the substrate is molded and then the elastomer is shot over it without the part ever leaving the press. Fast, clean, high-volume, expensive tooling. Insert molding (over-molding proper) molds the substrate first as a separate part, then loads it as an insert into a second mold for the soft shot. More flexible, lower tooling cost, works at lower volumes, but slower and with an extra handling step. Two-shot is the volume play; insert molding is the flexible, lower-commitment one.
The Practical Takeaway: How to Choose Without Getting Burned
The materials decision drives everything else, so make it first and make it carefully.
Start with the bond, not the feel. Before you fall in love with a grip texture or a durometer, settle which rigid substrate your part needs structurally, then find an elastomer grade formulated to bond to that substrate. The bond compatibility is the gate. Feel, color, and hardness are choices you make after you've confirmed the two materials will actually stick. Do it in that order and you avoid the most common overmolding failure there is.
Ask the elastomer supplier the direct question. TPE and TPU suppliers publish adhesion data—which of their grades bond to which substrate families, and how well. Get that chart and use it. The right question to a supplier is "which of your grades bonds to [my exact substrate], and what bond strength do you see," and a good supplier answers with specifics. If you're getting vague reassurance instead of a named grade and a number, keep pushing.
If chemistry says no, decide early between interlocks and a material swap. Don't discover the incompatibility on a peeled part. If your needed pairing won't chemically bond, choose deliberately: design mechanical retention into the substrate from the start, or change a material to a compatible one. Both are fine; what's not fine is finding out after the tool is cut. This is a first-week conversation, not a debugging session.
Match the process to your volume. High volume and you want the part clean and fast: two-shot molding, expensive tool, low per-part cost. Lower volume or earlier in the program: insert molding keeps the tooling cost and commitment down. And at genuinely low volumes, ask whether you even need to overmold—sometimes two molded parts and an assembly step, or a separate bonded grip, gets you there cheaper and with less tooling risk.
Respect the substrate surface. Even a compatible pairing bonds badly to a contaminated surface. Mold-release residue, oils, dust, or a substrate that's sat around collecting moisture can all weaken or kill the bond. A clean, dry, recently-molded substrate bonds best. If the substrate is molded separately and stored before the second shot, that storage matters—it's a real and frequently-missed cause of bond failure.
Overmolding rewards the engineer who treats it as a materials problem first and a molding problem second. Settle the substrate for its structural job, pick the elastomer for its bond to that substrate, confirm the compatibility with the supplier's own data, and only then argue about feel and hardness. Do that and the bond holds for the life of the part. Skip it—pick two materials that look right and hope they stick—and you'll learn which assumption was wrong the first time someone pulls on the grip.